Header coming soon
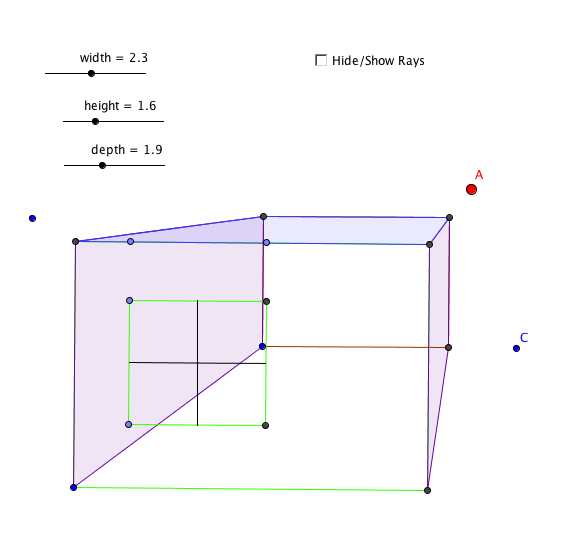
1 Point perspective geogebra lab
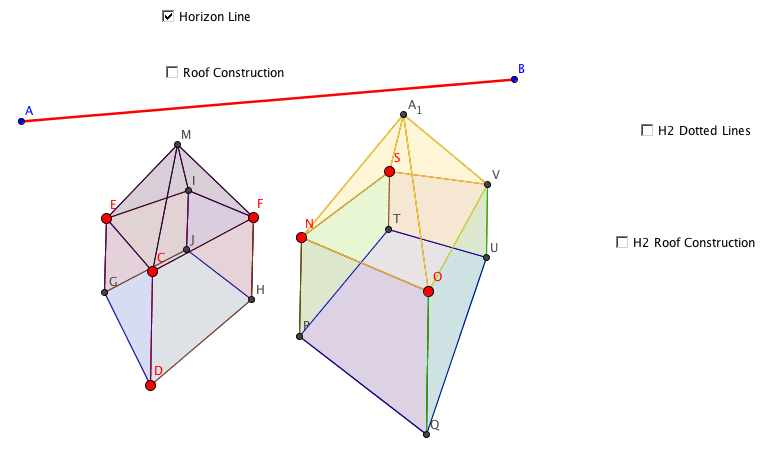
2 point perspective geogebra lab
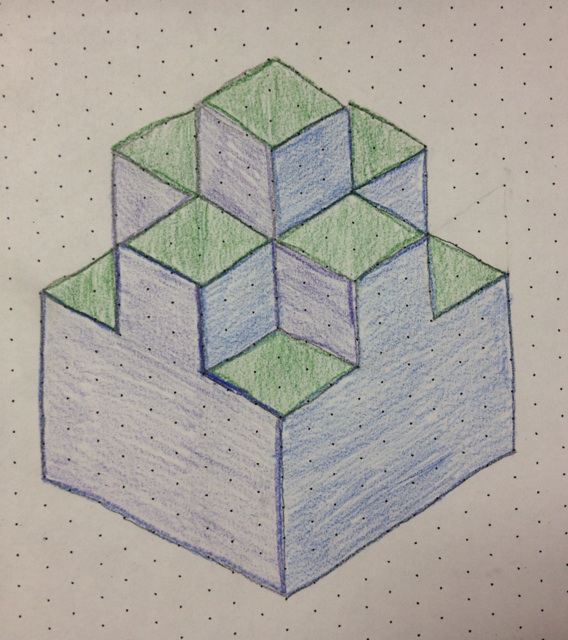
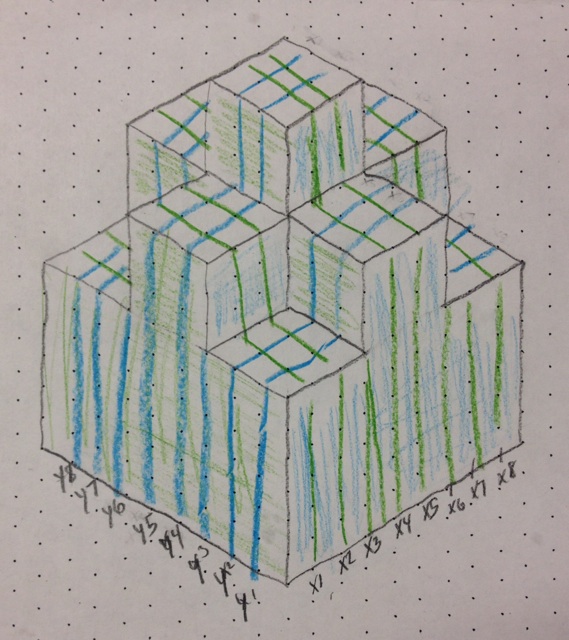
3D Objects from different perspectives

Anamorphic 3D Drawing Project
Made by: Bryce, Ian, and Duncan
*Special thanks to Brittney for helping!!
*Special thanks to Brittney for helping!!
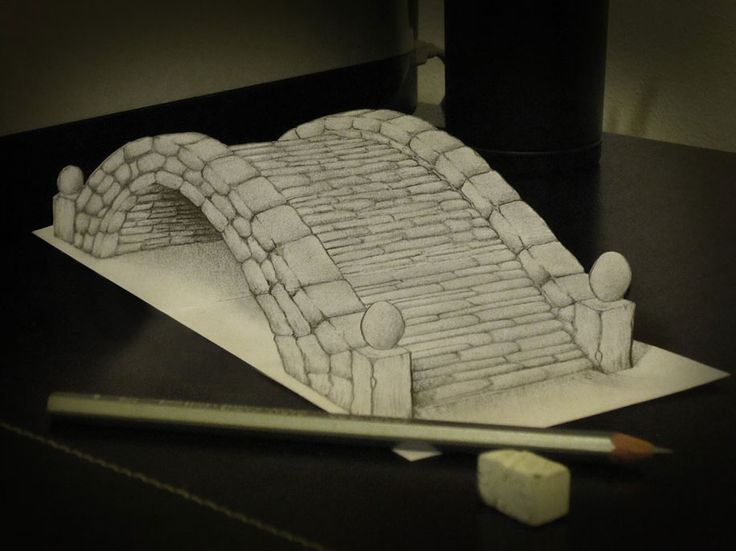
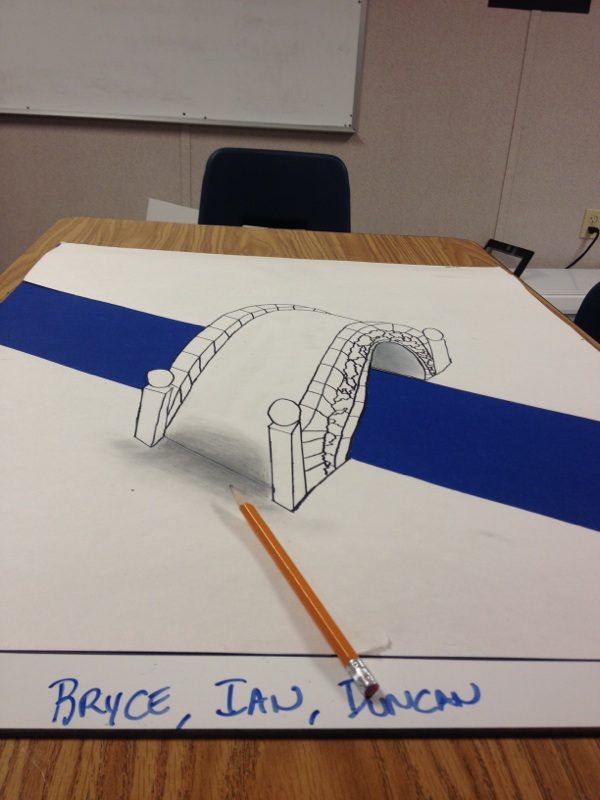
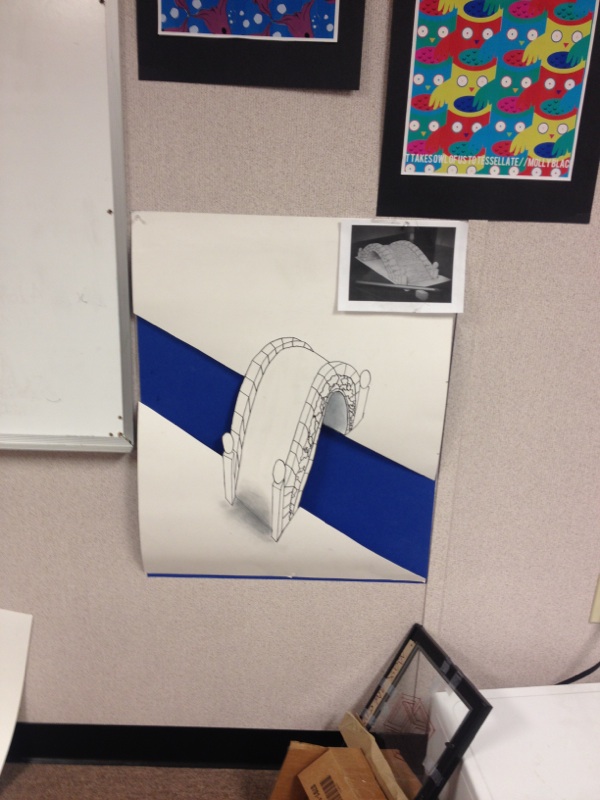
Anamorphic is an image that appears distorted unless viewed from a particular point or angle. When viewed from that angle the image takes the shape of a 3D drawing.
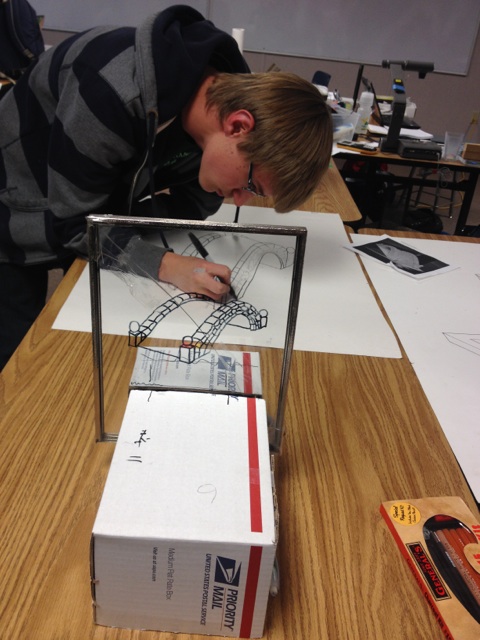
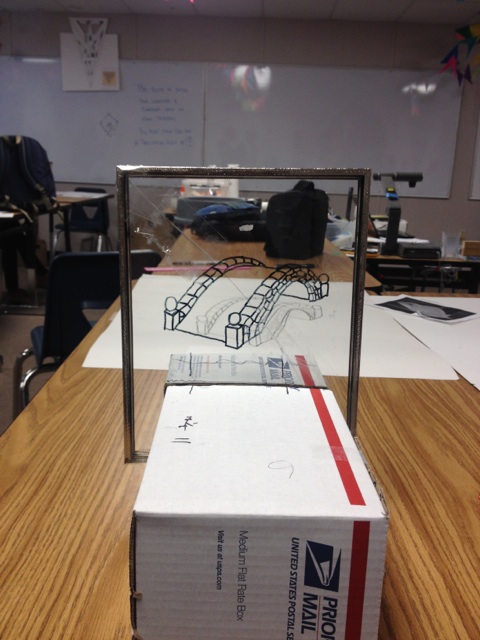
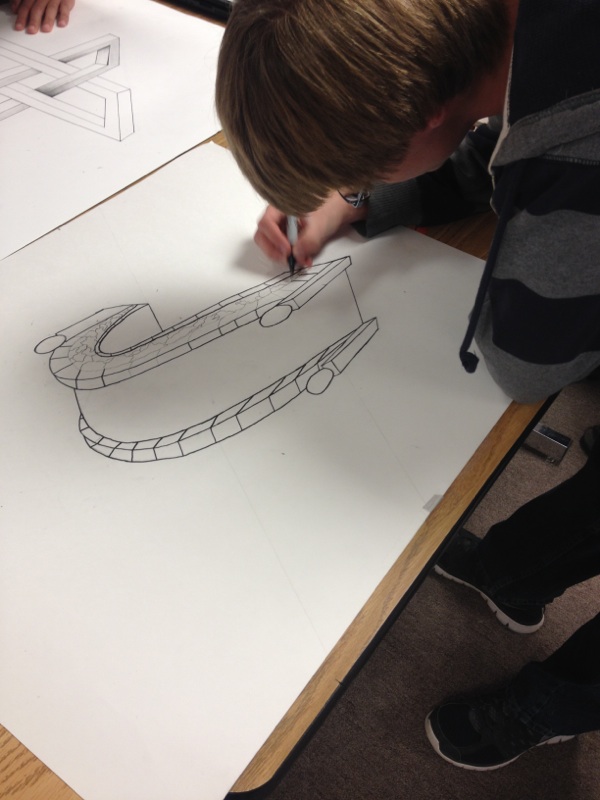
The supplies we used were pretty simple. We needed a poster board to draw the image on. The set up was a cardboard box, a glass pane, and a picture frame. For a little while we used a laser to locate points. We had a bridge picture printed off from the internet which we traced onto the glass with a vis-a-vis marker. I brought my charcoal drawing pencils set to use for the shading.
My anamorphic drawing is a result of projection because we traced our image onto the pane of the glass. Then someone sat in a chair behind the glass and closed one eye to look at the image. Focusing on a point they’d guide the person with the pencil, up, down, left, and right until the pencil tip matched up with where the person saw the point projected. Looking at the paper the points all looked far apart and stretched, but if you looked at the drawing from a certain angle it appeared 3D and bridge-like. At first my group used the laser to locate points but since the person’s hand was a little shaky it could only get you close so after a little while we just started at the last point drawn and the person directed us from there. Most of the time Ian and I alternated drawing points while Duncan directed us. At the end Ian and I used my charcoal pencils to shade under the bridge and where it met the paper. That part was a lot of fun, and it looked really cool, adding the 3D effect.
The biggest challenge we faced was trying to get reset-up each day. We measured the distance between the box and the paper but each time it was off. The 2nd day Duncan tried to find the points for awhile by moving the box and paper and angle. Ian was able to find it though so the second day he was the one telling us where to draw points. The reason we had had problems was because between days the chair moved positions, the paper and box might not be at the right distance or angle, and the position the person sat in changed. On the 3rd day we kinda gave up using the image on the glass and I started directing them from sitting in the chair but estimating the points. Then our friend Brittney came and helped us fix the drawing. She sat in the chair and got the image to somewhat line up then made us redo most of the points. The bridge looked a lot more 3D after she helped. Instead of solving the problem directly, we kept trying new arrangements and people hoping that would work. It would have been more productive to just stick with Duncan the whole time and figure out a way to have made it work.
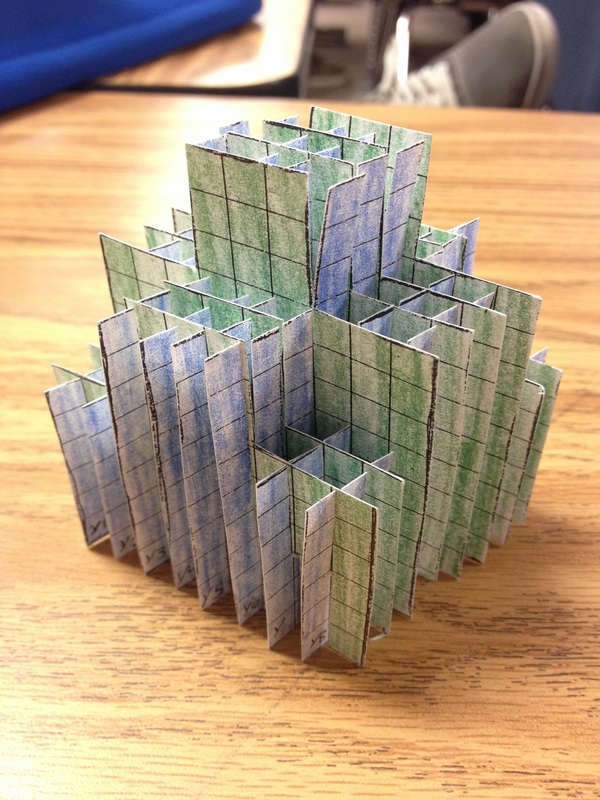
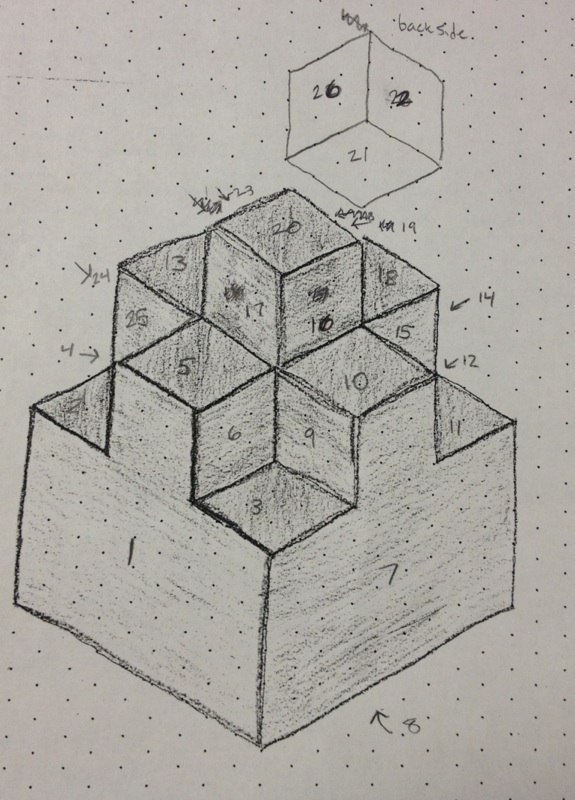
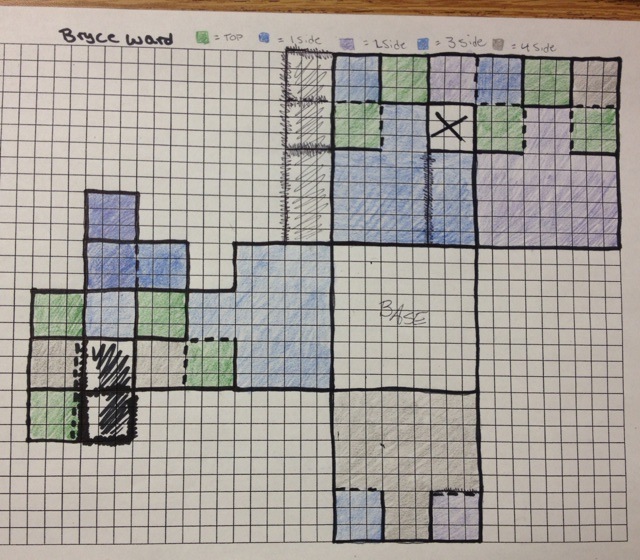
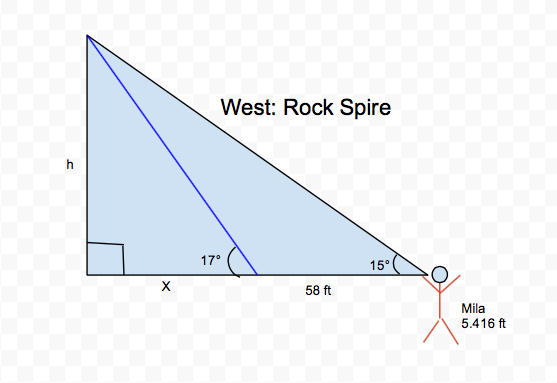
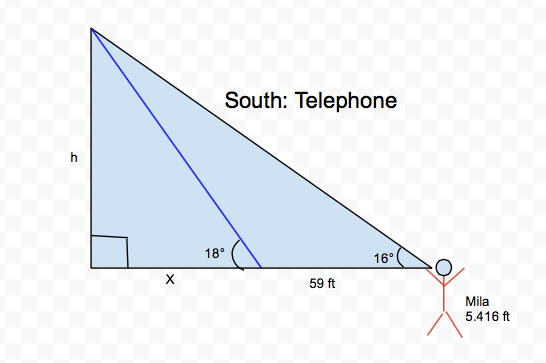
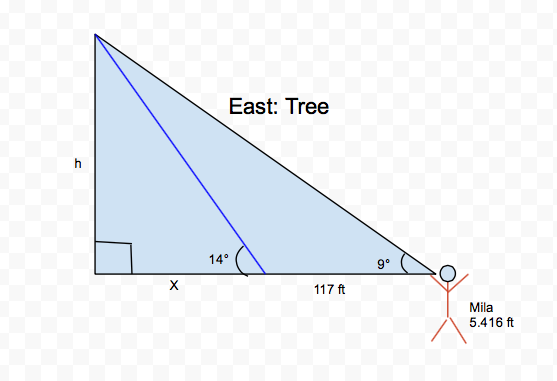
Finding Heights
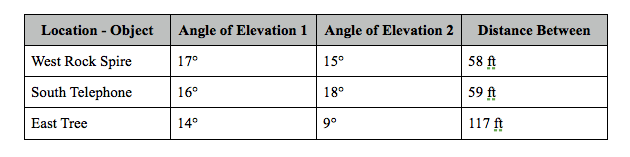
This is a table of the data we collected.
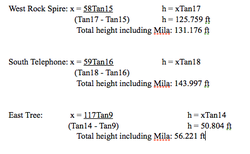
The equations we used to solve for the height of each object.
|
|
|
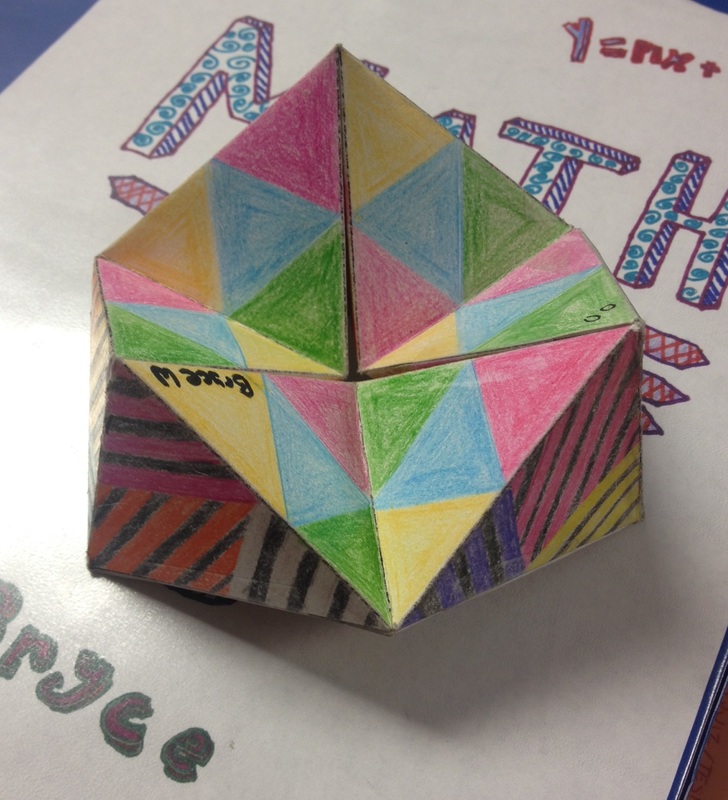
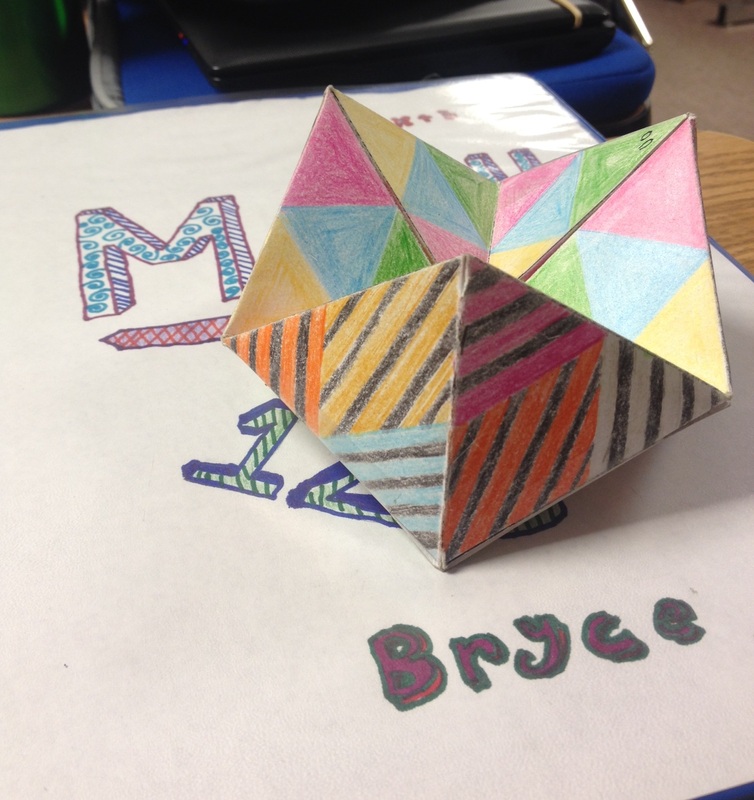
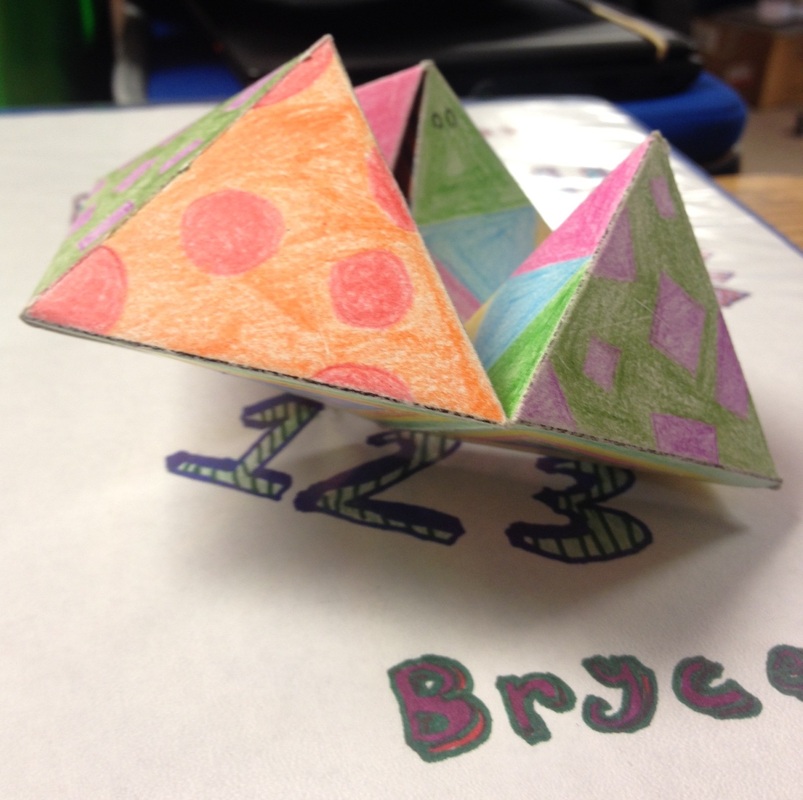
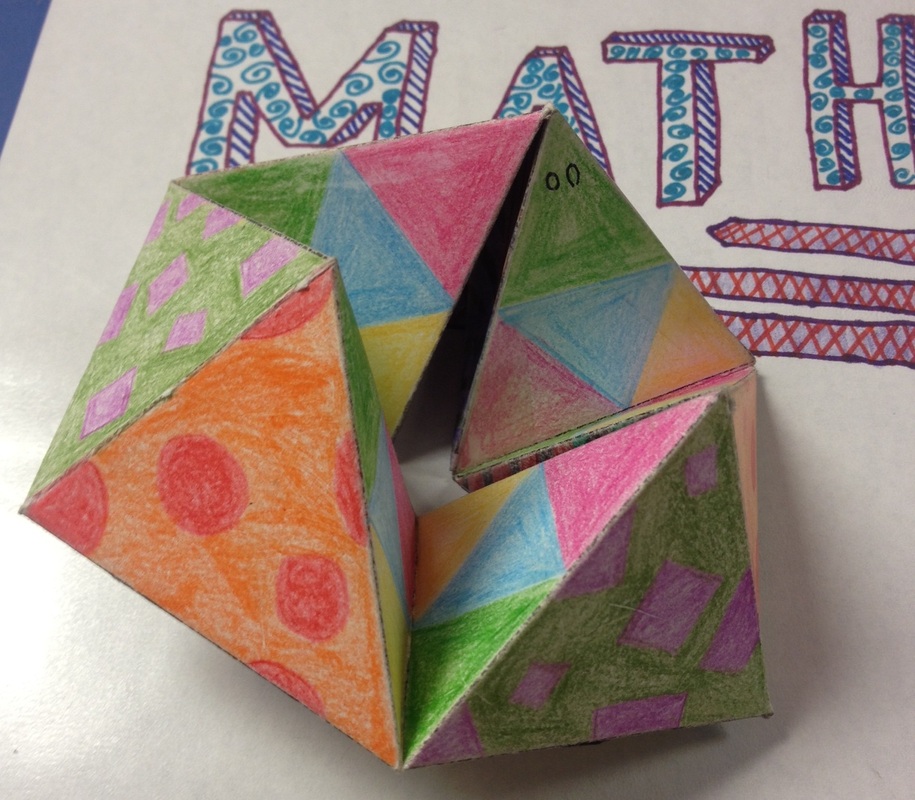
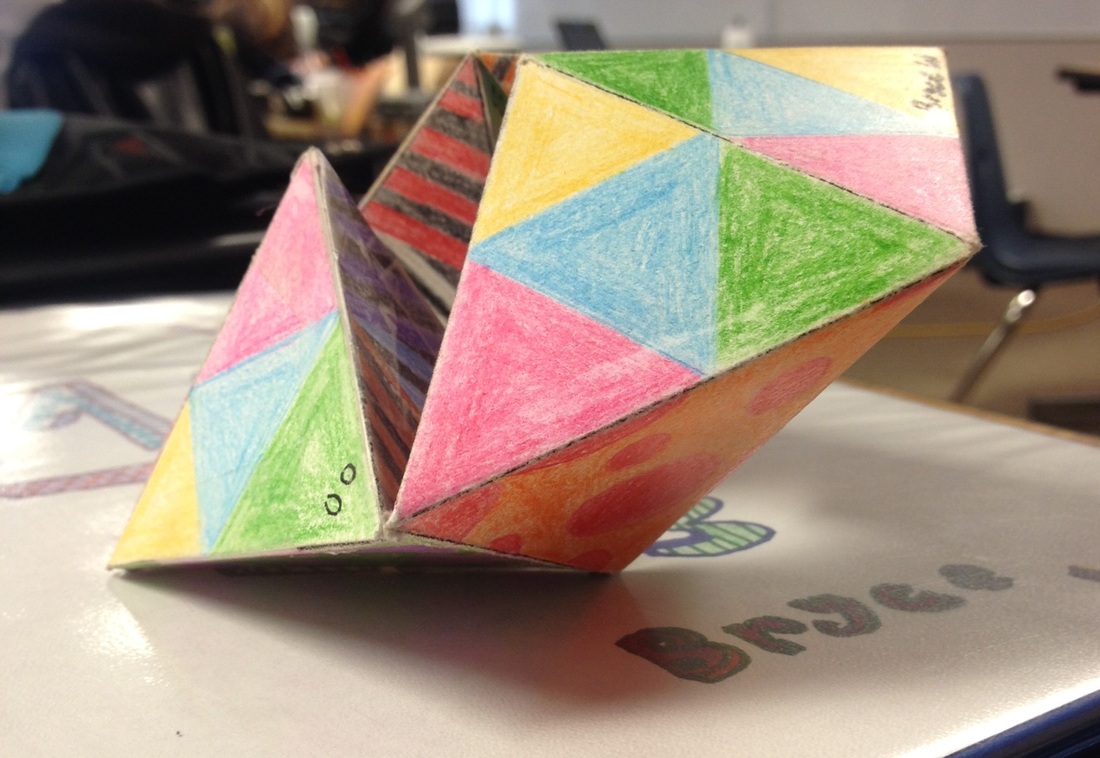
Hexaflexagon
It was suggested to use reflectional or rotational symmetry when coloring our Hexaflexagons. I didn't really do this though so mine is just a bunch of random triangles or shapes. My favorite side is the one with all the stripes and black lines in-between. I like it because I think it's the coolest looking and I probably spent the most time on it. Now that I better understand how it works, next time I would create a design that had reflectional or rotational symmetry as part of the design. I saw some pretty cool ones that my classmates created using reflectional and rotational symmetry. The biggest thing I learned about myself is that I am not very good and coloring with colored pencils. I also learned I'm not too creative when it comes to making a design for something like this.
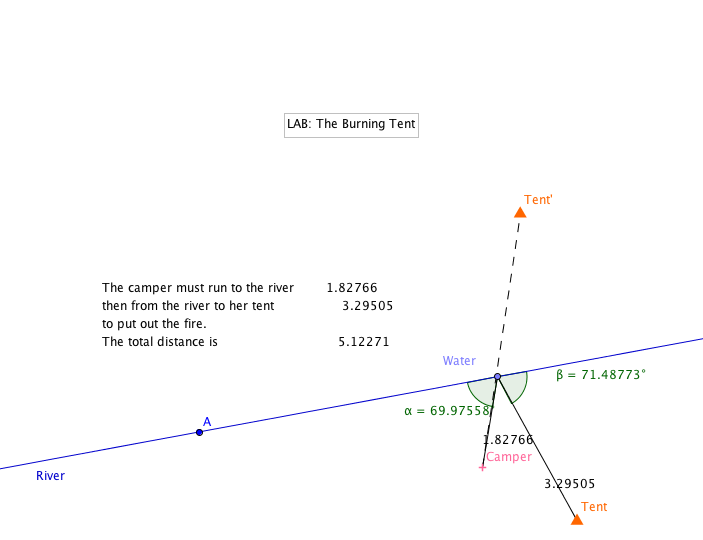
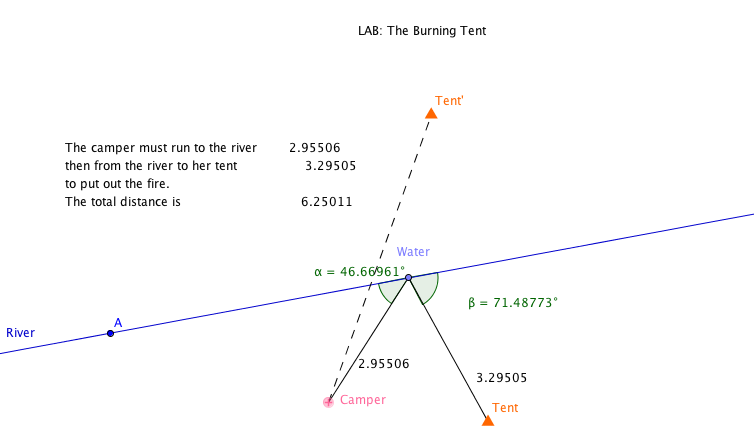
Burning Tent Geogebra Lab
A camper out for a hike is returning to her campsite. The shortest distance between her and her campsite is along a straight line, but as she approaches her campsite, she sees that her tent is on fire! She must run to the river to fill her canteen, and then run to her tent to put out the fire. What is the shortest path she can take?
To find the shortest distance from the camper to the river to the tent, we had to use the reflecting line of the tent fire to the camper. This is the shortest path because it lies on the reflected line. If you look at the text boxes in both pictures you can see the difference in the distance numbers. |
This is not the fastest way to get to the river and get the water to put out the fire. The dotted line represents the tent reflected across the river. The shortest distance to a fixed point is a strait line. In the picture as you can see, the camper is not on that reflected line, so they are not taking the shortest path.
|
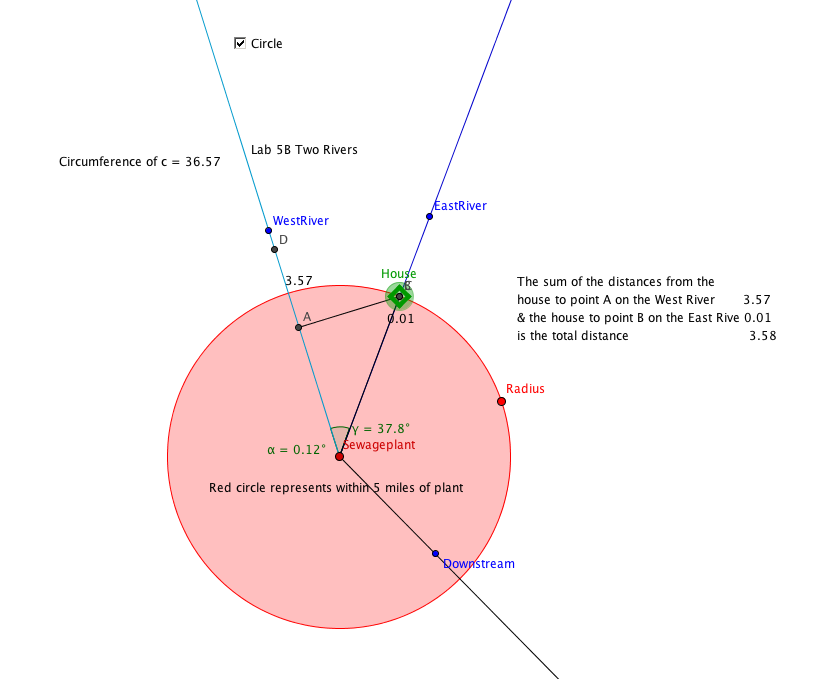
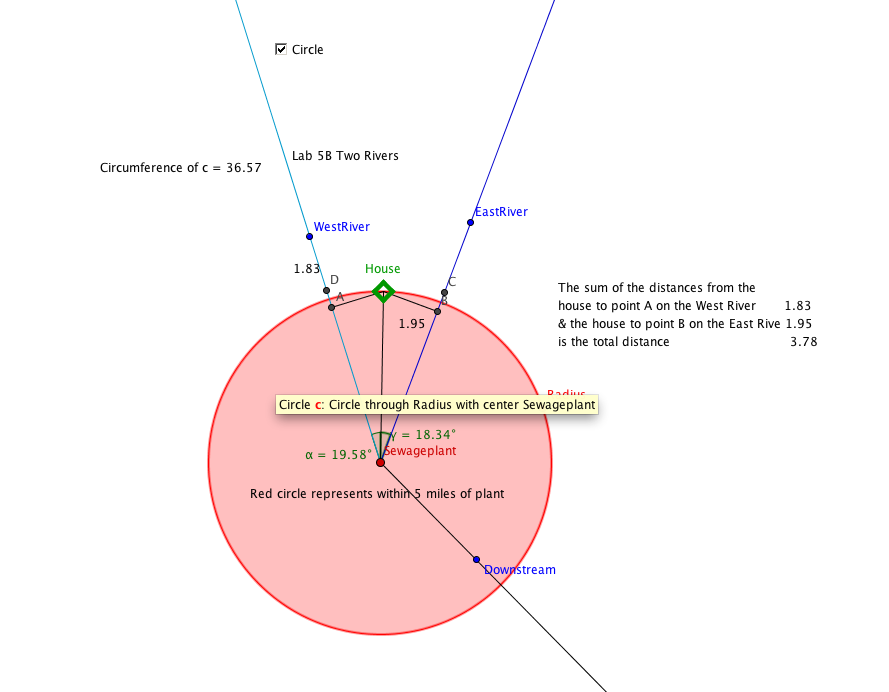
Two Rivers Geogebra Lab
There is a sewage treatment plant at the point where two rivers meet. You want to build a house near the two rivers (upstream from the sewage plant, naturally), but you want the house to be at least 5 miles from the sewage plant. You visit each of the rivers to go fishing about the same number of times but being lazy, you want to minimize the amount of walking you do. You want the sum of the distances from your house to the two rivers to be minimal, that is, the smallest distance. The essential question we answered in this lab is where should you build your house?
|
This is the location where you should build your house. If you look at the text box on the side it shows that the smallest distance is when the house is located on one of the rivers. Because a straight line is the shortest distance to anything, the house should be located on the bank of the river at the five-mile radius of the sewage plant. Either bank of the rivers is the shortest distance.
|
This is one location where you would not want to build your house because you walk a longer distance. Looking at the text box you can compare the numbers from both pictures and you'll see that it's smaller when the house is located on the river. If the house is located away from the bank of the river, then it creates a vertex between the house and the two rivers. Because a straight line is the shortest distance to something, creating a vertex cause the distance to increase.
|
Snail trail graffiti
|
This design was created using reflectional symmetry. If you look at the pretty picture, there are three sections that are mirrored images of the others. This was created by reflecting a dot six different times around a hexagon and then moving the main dot around the screen.
While creating this I learned I'm not the most skilled with drawing geometric shapes using technology. This was the best of all the ones I made. All my designs had the little 'flower' in the very center, which I really liked. |
|
